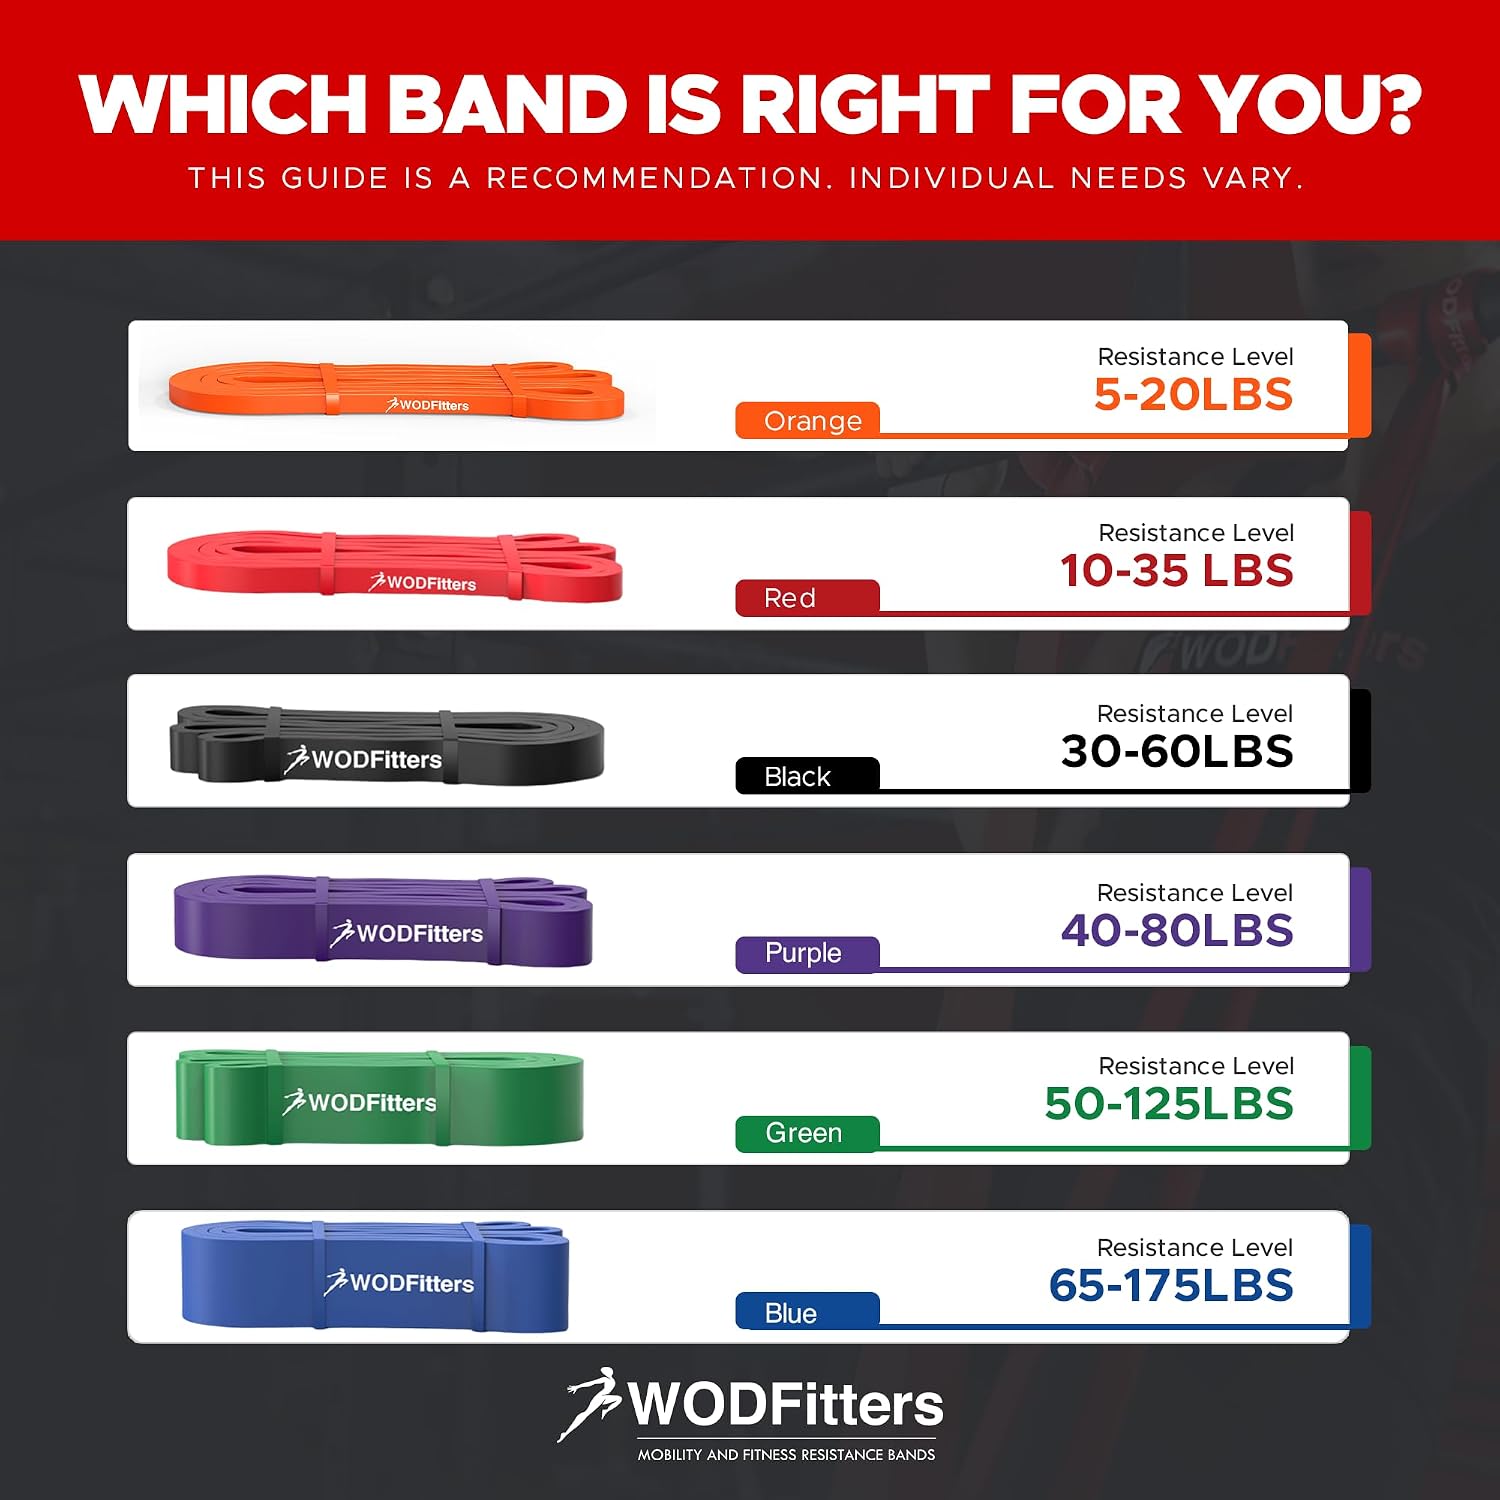
A pull-up assistance band is exactly what it sounds like: a large rubber loop that anchors to a pull-up bar, wraps under your foot or knee, and takes some of your bodyweight off so you can complete reps you couldn’t manage unassisted. Think of it like a counterweight — the more resistance (measured in pounds of upward force, called assistance) the band provides, the easier the movement becomes. The goal is to use just enough help to train the full range of motion while still making your muscles work hard — and then systematically reduce that help over time as you get stronger. Done correctly, band-assisted pull-ups are one of the most evidence-aligned bridges to unassisted reps. Done incorrectly — usually by using too much assistance for too long, or by never tracking the progression — they become a comfortable plateau that goes nowhere. This guide gives you a clear framework for calculating your actual resistance gap, matching it to a specific band or combination, and building a measurable progression plan.
| EDITOR'S PICK[HPYGN Two Foots Pull Up Assista…](https://www.amazon.com/dp/B0BLJVSN41?tag=greenflower20-20) | Mid-tier[WOD Nation Pull Up Assistance B…](https://www.amazon.com/dp/B00P7INEE4?tag=greenflower20-20) | Budget pick[WODFitters Pro Series Pull-Up A…](https://www.amazon.com/dp/B00IQM3WDQ?tag=greenflower20-20) | |
|---|---|---|---|
| Band length | Two Foots | 41 inch | — |
| Resistance range | — | 10-175lbs | — |
| Feet/knee rest | ✓ | — | — |
| Adjustable size | ✓ | — | — |
| Price | $35.97 | $22.98 | $16.97 |
| See on Amazon → | See on Amazon → | See on Amazon → |
Why “Bodyweight Gap” Is the Number That Actually Matters
Most band guides tell you to grab a “medium” band and get going. That framing skips the only variable that determines whether you’re in the right training zone: the difference between what you can currently lift and what a full unassisted pull-up demands.
Here’s the operative math. A pull-up requires you to lift roughly 70–80% of your total bodyweight (the remainder stays supported by shoulder-girdle positioning and lat engagement at the bottom of the stroke — not a perfectly clean figure, but the range is consistent across biomechanics literature). If you weigh 185 lbs, the load you’re moving is approximately 130–148 lbs. If you can currently complete zero unassisted reps with good form, your entire working load is your bodyweight gap. If you can do 3–4 ugly reps, you probably have a 30–60 lb gap — you’re close, but not there.
The NSCA’s Essentials of Strength Training and Conditioning (4th Edition) frames accommodating resistance training around matching load to the trainee’s actual strength curve — the same logic applies here. You want assistance that puts you in a rep range of 5–8 with 2–3 reps left in the tank. Too much band and you’re training motor patterns at a load your muscles don’t have to own. Too little and you fail before the stimulus is sufficient.
Quick Self-Assessment
Before you buy anything, run this test:
- Unassisted hang test: Can you hold a dead hang for 30+ seconds? If no, grip and shoulder stability are the limiting factor, not pulling strength — address those first.
- Negative pull-up test: Jump to the top position (chin over bar) and lower yourself as slowly as possible. If you can’t control a 3-second descent, you have significant strength below threshold.
- Rep test with your current band: If you already own one, how many reps can you do with good form before the set breaks down? Six or more means the band is too heavy; two or fewer means it may be too light.
The Resistance Band Tension Chart: Matching Numbers to Bands
Resistance bands don’t produce a fixed number — they’re elastic, so tension increases as the band stretches. Published tension specs describe the usable assist range at the stretch lengths typical of a pull-up stroke (roughly 24–36 inches of stretch depending on your height and grip position). Here’s how the major band categories map out:
| Band Width / Category | Typical Assist Range | Best Fit For |
|---|---|---|
| Light loop (~1/2”) | 10–35 lbs | Athletes within 20 lbs of unassisted |
| Medium loop (~3/4”) | 25–65 lbs | Early-intermediate trainees, 20–50 lb gap |
| Heavy loop (~1–1/8”) | 50–120 lbs | Beginners, 50–100 lb gap |
| Extra-heavy (~1–3/4”) | 65–175 lbs | Larger athletes, post-surgical, high-gap beginners |
Tension figures drawn from published spec sheets by Rogue Fitness (Shorty Monster Band series), EliteFTS band product documentation, and Perform Better’s loop band catalog. Note: tension specs vary meaningfully between brands at the same listed width — always check the manufacturer’s published elongation chart, not just the color or size label.
Barbend’s resistance band pull-up guide notes exactly this discrepancy: a “medium” band from one manufacturer may overlap significantly with a “heavy” from another. This is not a minor rounding error — it’s a 20–30 lb swing that can push you out of the productive training zone entirely.
Building the Progression: Three Phases with Clear Exit Criteria
Progression in band-assisted pull-ups has three distinct phases. Each phase has a specific band (or band combination), a target rep scheme, and a measurable exit criterion. If you’re a strength coach or PT building this into a periodization block, treat these as 3–6 week phases with reassessment at the boundary.
Phase 1 — High Assistance (Bodyweight Gap > 50 lbs)
Band selection: Heavy to extra-heavy loop (50–120 lbs assist range). For athletes over 200 lbs with zero unassisted reps, a stacked combination — one heavy plus one medium — is often appropriate.
Training target: 3–4 sets of 5–8 reps, 2–3x/week, with a controlled 3-second eccentric (lowering phase). The eccentric emphasis matters here because Stronger By Science’s review of accommodating resistance (Greg Nuckols) highlights that neural adaptations to eccentric loading transfer meaningfully to concentric strength — you’re not just building muscle, you’re programming the motor pattern.
Exit criterion: When you can complete 4 sets of 8 with the current band, with a 3-second eccentric and no kipping, it’s time to move to a lighter band or remove the stacked layer.
Recommended products to research:
Phase 2 — Moderate Assistance (Bodyweight Gap 20–50 lbs)
Band selection: Medium loop (25–65 lbs assist range). This is where most intermediate athletes spend the most time — and where most stall. The band is light enough that you feel real effort, but it’s masking compensatory patterns if you’re not careful.
Coaching cue to build in: At this phase, Perform Better’s training resource documentation recommends using foot-loop anchoring rather than knee-loop, because knee anchoring subtly shortens the effective range of stretch and delivers slightly more assistance than it appears to — which is fine in Phase 1 but will undercut your transition readiness in Phase 2.
Training target: 4 sets of 6–8 reps, adding one rep per set each week before progressing the load. When you hit 4×10, strip to the next lighter band.
Exit criterion: 4×10 at medium assistance with full ROM and zero kipping.
Phase 3 — Light Assistance and Bridge to Unassisted (Gap < 20 lbs)
Band selection: Light loop (10–35 lbs assist range). At this phase, the goal is not to make reps easier — it’s to guarantee you hit enough volume to drive adaptation without missing reps that would break the training stimulus.
The clinical perspective: TheraBand’s CLX band documentation and progression protocols (used widely in physical therapy settings) describe this light-assistance zone as analogous to their Level 6–7 bands — the point where the band provides proprioceptive feedback and a small mechanical cue, but not meaningful load reduction. That framing is useful for coaches: at Phase 3, you’re not really assisting anymore; you’re just keeping the pattern clean.
Training target: 5 sets of 5 with the light band, supersetting with 1–2 unassisted attempts at the end of each set. Track the unassisted reps weekly.
Exit criterion: When you can reliably hit 3 unassisted reps with good form in those post-set attempts on two consecutive training sessions, drop the band entirely and run an unassisted protocol.
Brand Consistency Note: Why Tension Specs Require Cross-Referencing
This is worth naming explicitly because it affects buying decisions materially. There is no industry standard for resistance band tension labeling. A band sold as “40–80 lbs” by one brand may peak at 65 lbs at the stretch length a 5’8” athlete produces in a pull-up, while another brand’s same-labeled product peaks at 90 lbs. Barbend’s spec comparison work and Perform Better’s published elongation charts both highlight this problem.
Practical rule: When evaluating a band for pull-up assistance, look for published tension specs at 36-inch elongation — not the marketing range on the label. Rogue Fitness and EliteFTS both publish these figures; many budget brands do not. If elongation specs aren’t available, use the community-aggregated tension data from training forums as a proxy, and buy one band before committing to a set.
Periodization Integration: Where This Fits in a Training Block
For strength coaches specifying band work within a broader program: pull-up band progression pairs cleanly with a 4-week accumulation / 2-week intensification structure. Run Phase 1 for 4–6 weeks during accumulation (higher volume, moderate effort), then phase into Phase 2 during intensification (lower volume, higher relative intensity). Phase 3 bridges the final deload-to-peak transition — athletes are fresh, the band provides just enough to guarantee quality reps, and unassisted attempts land in a recovered state.
For rehabilitation patients following post-surgical shoulder or elbow protocols, the APTA’s clinical practice guidelines on upper extremity strengthening recommend resistance progression be cleared by the supervising clinician before advancing band phases — Phase 1 entry should be cleared at the appropriate post-operative milestone, and eccentric emphasis should be introduced gradually, not on Day 1.
Clear Decision Rules: If X, Then Y
If you weigh over 200 lbs and have zero unassisted reps → Start with a stacked heavy + medium band combination. Buy from a brand that publishes elongation specs (Rogue, EliteFTS, Perform Better). Budget $35–$75 for a set that covers Phase 1 and 2.
If you can do 3–5 ugly reps and want to clean them up → You’re in Phase 2. Buy a single medium loop band. A $15–$30 mid-range option (WODFitters, Bodylastics) is appropriate here; you don’t need premium rubber for this phase.
If you’re a PT outfitting a clinical practice → TheraBand CLX sets and Perform Better systems give you the documented tension progressions and color-coded protocols that integrate with standard documentation and patient education. Expect to spend $30–$85 per set; the color system is worth it for patient-facing communication.
If you’re within 10 reps of your goal and hitting a plateau → The band is probably providing more assistance than it appears to (see the elongation-spec problem above). Cross-reference your band’s published specs at 36-inch stretch. You may be using a “medium” that’s acting like a heavy. Drop one band category and accept short-term rep loss — it’s a better long-term trade.
If you’re coaching an athlete who can’t get out of Phase 1 after 8 weeks → Pull-up strength may not be the limiting factor. Check scapular stability, lat activation patterns, and grip endurance before adding more band volume. The NSCA recommends a movement screen re-evaluation at the 6–8 week mark for athletes who aren’t progressing on an assisted protocol.
The band is a tool, not a destination. Match the resistance to the actual gap, track the exit criteria, and the progression takes care of itself.